Many users across the world have reported about QuickBooks error H202. It is the most common yet agitated issue. Not only does it restrict you from accessing the software in a multi-user environment but brings other nuisances as well. The error appears with text that states “QuickBooks company file is located on a different computer and QuickBooks requires some help connecting.”
This error indicates that the software is unable to access a QB file due to the blocking of a multi-user server. You can easily troubleshoot the issue with the solutions provided below. However, if you want then download and install QuickBooks file doctor for quick troubleshooting.
What is QuickBooks Error H202
The issue is also known as a multi-user switching error. Not only do these described situations bring this error into the system but you can also face it when switching to multi-user mode from a single user. There has been so much that a user should understand so let’s move and learn its causes and symptoms to detect the issue.
Major Causes of QuickBooks Error code H202
QuickBooks error H202 switching to multi-user mode can occur due to any of these:
- QBCFMonitor or QuickBooksDBXX have some issues.
- The firewall blocks the connection between the server and QB.
- Misconfiguration of hostings.
- Damaging of the .nd file.
- QuickBooks desktop does not contain the IP address of the server and host.
- DNS settings are inappropriate.
- Issues within the QuickBooks database server manager.
Symptoms to Identify QuickBooks Error H202
Ensure the prevalent issues by acknowledging these points. You will easily identify the issue once knew these symptoms:
- The screen pops up with QuickBooks Error H202.
- Slow performance of Windows.
- When a user finds issues while accessing the QB file.
- The system is running slowly.
- The screen turns black.
- While not switching to multi-user mode.
Top Solutions to fix QuickBooks Error H202
These solutions help you to resolve the error right away. Not only we have mentioned the use of QuickBooks File Doctor but other solutions as well. Make sure to conduct the steps as suggested and eradicate this issue.
Solution 1: Run QuickBooks File Doctor
QuickBooks file doctor is the only tool that can tackle network and company file issues within QuickBooks. You can access it from the tool hub. If you are in dark about using and running this tool then take some help from the steps below:
- To initiate, go to the official download page of the tool hub.
- You can find it on the Intuit website.
- Thereafter, try to download and install the QuickBooks tool hub.
- After completing this process, open the tool hub.
- Consequently, choose the Company File button.
- Then, hit Run QuickBooks file doctor.
- Get into the drop-down menu.
- Pick your company file from there.
- If you cannot detect the file then click the Browse option.
- Later, select the Check file damage only box.
- Tap Continue.
- Further, you need to specify the QuickBooks admin password.
- Choose Next.
Just ensure that the time for scanning majorly depends on your file size and internet speed. If it is taking more than 5 minutes then these two factors are responsible.

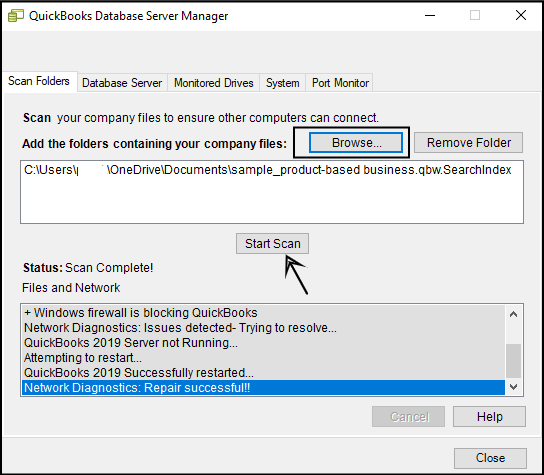
Solution 2: QuickBooks Database Server Manager
If the error has not yet been resolved by the file doctor, then use another Intuit-developed tool QuickBooks Database Server Manager. This tool is also built to resolve issues while switching to multi-user mode. So, make sure to run it.
- To begin with, access the Windows Start menu.
- Go to the search field and type the database there.
- Moreover, you need to choose the QuickBooks database server manager.
- Find out the folder where you have stored the QB files.
- Tap the Browse button to find it.
- Thereafter, click Start Scan.
- Try to resolve the settings within the QBDBSM.
- Pick Close when the whole scanning procedure ends.
- Later, you need to access the software on each workstation.
- Then, visit the File menu.
- Pick the Switch to multi-user mode button.
- The error will disappear if you are having no issues while using multi-user mode.
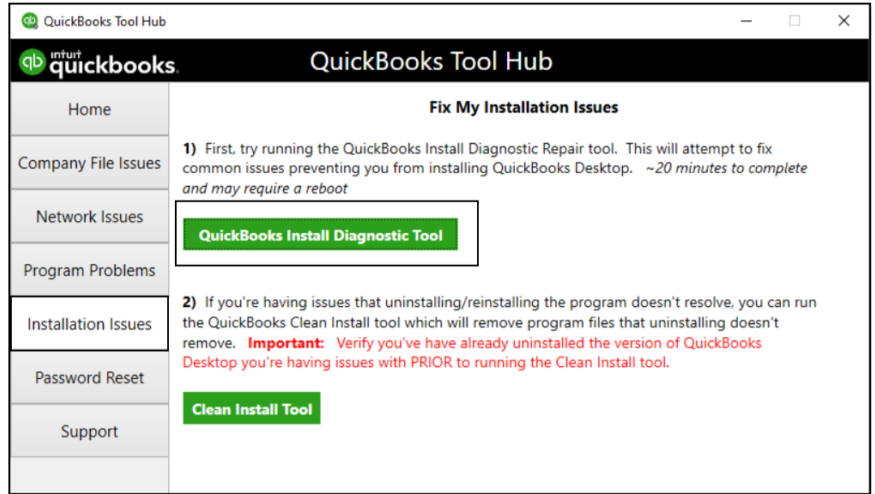
Solution 3: Run QuickBooks Install Diagnostic Tool
Installing QuickBooks might bring issues to your QB files. So, try to fix it with the help of these guidelines:
- Open the tool hub.
- Pick the Installation Issues button.
- Thereafter, choose the QuickBooks Install Diagnostic Tool button.
- Try to conduct the scanning of the QB folder.
- Make sure that you note down the IP addresses and network interfaces.
- Also, enable the ports if the firewall has an Open port.
- Navigate towards testing the data file connectivity and click on the same.
- Just access the QB data file.
- Finally, check if you have resolved this error or not.
Solution 4: New Folder for QuickBooks
- Go to the server.
- Try to create a new folder there.
- After that, you need to modify the permissions for QB files and a new folder.
- Make sure that you copy the .qbw file to a new folder.
- Hit the Ctrl + C buttons to do so.
- Also, check if the multi-user mode is working or not.
Solution 5: Check QuickBooks Services
- To initiate, access QuickBooks software on the server.
- Choose File and pick Utilities.
- Then, you need to click on the Host multi-user access.
Try to examine the running status of these two services QBCFMonitorService and QuickBooksDBXX with the steps below:
- Access the Run window.
- Enter services.msc in the search field.
- Hit the OK button.
- After that, you need to click on QuickBooksDBXX.
- Set the Startup type as Automatic.
- Hover your mouse towards the Service status.
- Choose Running beside it.
- Click the Recovery button.
- Further, pick Restart the service from the drop-down of first, second, and subsequent failures.
- Choose the Apply and OK buttons.
- Try to do the same procedure for QBCFMonitorService.
Solution 6: Ping Server from a Workstation
Just ensure to run your QuickBooks as an admin before conducting this solution.
Enable Network Discovery on Server
- Open the server and workstation.
- Then, just access the Windows Start menu.
- Thereafter, open the Search field and enter Network there.
- Make sure to access the Network and Sharing Center.
- Consequently, click on Change advanced sharing settings.
- Pick Turn on the Network discovery button.
Get Server Name
- Initially, access the Windows Start menu.
- Get into the search field and enter the Run tab.
- Access the Run command.
- Subsequently, enter CMD there.
- Hit Enter.
- Open the CMD window and enter ipconfig/all.
- Again, hit Enter.
- Try to search for the Host Name inside the Windows IP Configuration window.
- Try to locate the server name on the right side of your screen.
- Just note down the hostname.
- Copy the same to a word document.
Examine Network Connectivity
The user can examine the network connectivity on the workstation with the help of these steps:
- Access the Run window.
- Specify CMD inside the search bar.
- Try to ping the server now.
- Subsequently, enter the ping_server name.
- Click Enter.
- Conduct the steps as suggested above on every system.
- If there are some issues within the network then try to resolve them.
Solution 7: Firewall Configuration
A firewall creates issues while sharing the data between the server and QuickBooks. So, try to configure it through the steps below:
- Open the system firewall.
- Try to make exceptions there.
- After that, modify the changes within the firewall.
- Open QuickBooks on every computer.
- Pick the File menu.
- Consequently, tap Switch to multi-user mode.
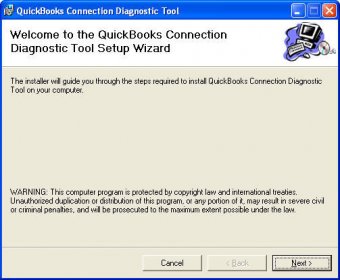
Solution 8: Run QuickBooks Connection Diagnostic Tool
- Try to first download and install the tool.
- Now, you need to scan the QB folder.
- Once done, just note down the IP address that appears when you run QuickBooks connection diagnostic tool.
- After that, try to configure the firewall ports.
- Go through the instructions carefully.
- Just accessing the company files on the computer brings an H202 error.
Solution 9: Access Windows Control Panel
- First of all, close QuickBooks on every system.
- Access the Windows Control Panel.
- Thereafter, you need to click on the Programs and Features button.
- Pick QuickBooks and also choose the Change and Repair option.
- Consequently, try to provide positive options for QB software repair.
- Update your software with the newest release.
- Finally, open your QB file to see if an error has been resolved or not.
Solution 10: Modify the Company File Location
- Open Drive C: on your computer.
- Make a new folder there.
- The folder will be used to store the QB file.
- After that, click on the company file folder.
- Thereafter, choose the Company file and the respective.TLG file.
- Hit Ctrl + C buttons.
- Once done, move towards the QB file folder.
- Consequently, choose Paste.
- Also, examine if you can work smoothly with multi-users or not.
Solution 11: Rename .TLG and .ND File
These two files are essential for establishing network connections on multiple workstations. You can proceed with the steps to know how to conduct this solution.
- Just close your QuickBooks.
- Open the server and access the QB folder.
- Try to locate the .tlg file.
- Then, perform a right-click on the tlg file.
- Hit the Rename button.
- Modify the prefix by adding old there.
- Consequently, hit Enter.
- Do the same procedure for nd file too.
- After that, these files will become created on their own.
- Thereafter, access the QB file.
- Hit the alt key continuously till you open the file.
- The error would be resolved thereafter.
Solution 12: Add Server on Windows Host File
- Initiate the procedure by closing QuickBooks.
- Then, move towards C:\Windows\System32\Drivers\Etc or C:\Windows\Syswow64\Drivers\Etc on your server.
- Perform a double-click on the host’s file.
- Consequently, choose the Notepad button.
- Try to insert the IP address manually.
- Also, the name of your computer.
- Server: Enter the IP and Name of the computer
- Computer: Enter the IP of the server and the name of the computer.
- Instead of using the space key, try to use the Tab button for giving the space.
- Just access QuickBooks in multi-user mode and check if the error persists or not.
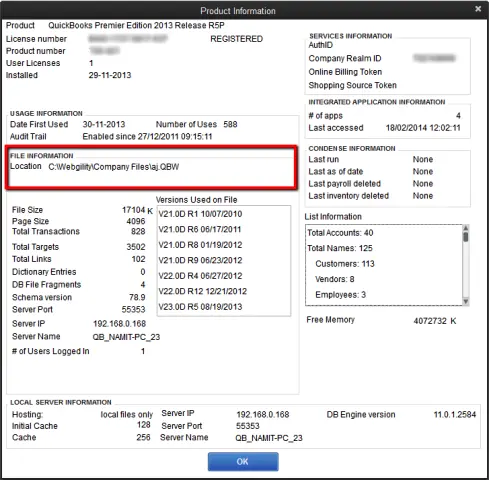
Solution 13: Set Hosts to Local Files
- Open the QuickBooks software.
- Hit the F2 button to access the product information window.
- Thereafter, go to the left corner of the screen.
- Choose Hosting to reflect local files.
Solution 14: Repair and Update QuickBooks
- Access the Control Panel button.
- Navigate towards the Programs and Features button.
- Tap Programs.
- Search for QuickBooks on the list of all programs.
- Consequently, perform a right-click on the same.
- Hit Uninstall/Change button.
- Click Repair.
- Moreover, choose Next.
- The screen brings you some instructions that you need to follow.
- After that, update the software to its newest release.
- Access QuickBooks.
- Tap the Help menu.
- Subsequently, select Update QuickBooks.
- Get all the updates in right away.
- Once done, just restart your system and use the software.