You may have ended up with QuickBooks error H505 while accessing QuickBooks in multi-user mode. This error denotes some issues in the multi-user setup. That’s why the user could not access the company file. It is yet another form of H series that happens as multi-user errors. In a multi-user setup, the company file is situated in the host system. While several other workstations are connected to it for accessing files and data. At times, the workstation user faces issues while opening the QB file. This issue is termed the H series error.
You can encounter any of the issues under this error category such as QuickBooks errors H101, H202, H404, and H505. You must develop a better understanding of this issue to remove the error effortlessly. So, just move in and learn what QuickBooks H505 error message is.
What is QuickBooks Error H505?
We have already discussed that this error occurs when you switch to multi-user mode. This nagging error obstructs the connection of the multi-user to the server. After getting infected by this error, your screen shows a notification.
Belonging to the H series, this error is accompanied by H202, H101, H303, etc. You are immediately stopped from resuming your task and we know how bad it can affect your business. But the question is, why does this error take place? Let’s move to that part.
Reasons for the QuickBooks Error H505
This nagging error doesn’t appear from anywhere, several factors are responsible for its birth. You can avoid the same error to take place in the future after learning the main source of it. Let’s read the factors behind QuickBooks Error Code H505.

- The firewall is stopping the communication (both incoming and outgoing) to your company file.
- Improper configuration settings of the hostings.
- The database server is unable to scan all QuickBooks files/folders on the server.
- Missed, damaged, or lost .ND file.
- QuickBooks is unable to trace the computer’s IP address.
- QuickBooksDBXX service isn’t functioning.
- Improper DNS settings.
Indications to Identify QuickBooks H505 Error
Many QuickBooks errors are similar which can cause confusion among users. This is why they apply the wrong methods to fix an error and badly fail. So, to save you time and patience, we have covered the main symptoms of QuickBooks error H505.
- You can’t work in multi-user mode.
- QuickBooks Error H505 crashes the program window.
- When you try to access the company file, your laptop crashes.
- Another indication is the appearance of the error code related to “H505 QuickBooks Error Fix” on your screen.
- The windows function slowly to the inputs by keyboard and mouse.
- The system periodically freezes.
- When you tap on the QuickBooks Icon, the mouse cursor just stops moving.
After learning the causes and symptoms, you now have sufficient information about QuickBooks Enterprise Error H505 and can move to the troubleshooting part.
Things to Do Before Resolving QuickBooks Error H505
Here are lots of things that you should perform on your system. Such as:
- Updating QuickBooks desktop.
- Run Quick Fix my program.
- Also, make a backup of the company file.
- Firewall configuration on your system.
- Start the QuickBooks database server manager.
How to Fix QuickBooks Error Code H505?
This nagging error is frustrating as hell but at the same time is fixable with some technical aid. You will get all the information to deal with error code H505 QuickBooks efficiently in the further part.
Method 1: Using QuickBooks File Doctor Tool
QuickBooks File Doctor acts as a defense wall against numerous errors in the software. It has various tools that scan and fix the error immediately. Let’s check how to utilize it.
- Check that you have the latest version of QuickBooks installed in your system.
- Visit Intuit website and start downloading QuickBooks Tool Hub.
- After successfully downloading it, install it on the system and run it.
- Reach out to the “Company File Issues” section in the tool hub and choose QuickBooks File Doctor. Remember, the tool can consume some time to download.

- After it is successfully installed, choose “Repair Company File & Network.”
- In the end, attempt to access the company file one more time after completing the repair process.
Method 2: Checking QuickBooks Services and Verify the Hosting
Follow the steps mentioned below to check the services hosting:
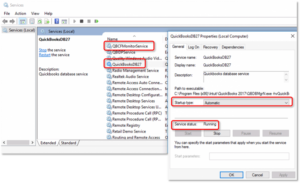
First Step: Verify the Services
- Confirm that QuickBooksDBXX & QBCFMonitor services are working:
- Tap on “Windows/Start.”
- Type “Window+R.”
- Enter “MSC” & hit “Enter.”
- Find “QuickBooksDBXX service” in the service window.
- If you can’t see the QuickBooksDBXX service:
-
- Check that you have installed the Database Server Manager on the server.
- After that, open QuickBooks, in case you run a complete program on your server.
- At last, enable the hosting by verifying it.
- Now, open “QuickBooksDBXX” and check that the status of the startup type and service has started.
- Tap on “Recovery.”
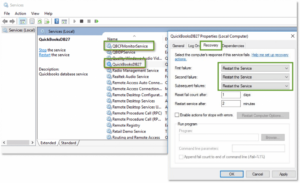
- At last, “Save” all changes.
Second Step: Verifying the Hosting
- Firstly, open “QuickBooks” on all systems.
- Reach out to “File.”
- Then tap on “Utilities.”
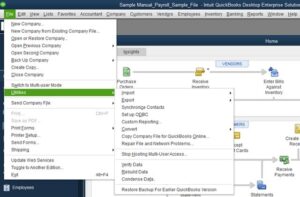
- If “Host Multi-User Access” is visible on the list, it implies that the system can’t host the file.
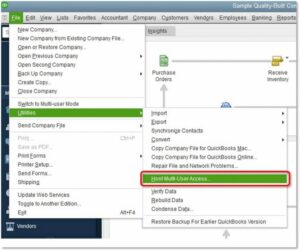
- If “Stop Hosting Multi-User Access” is visible then select it.
- Now, reach out to “Company.”
- Select the “File Must Be Closed window.”
- Tap on “Yes.”
You Might Also Like: QuickBooks Install Diagnostic Tool
Method 3: Edit the Host File
These steps will help you in editing the Host File:
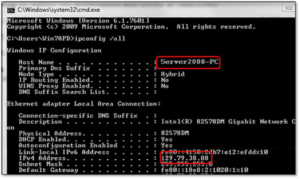
Step 1: Look for the IP Address and Server Computer Name
- Hold “Windows + R” and access the “Run dialog box“.
- Then, write “Cmd” and press “Enter.” It will open a Command prompt window.
- After that, write “ipconfig / all.” Press “Enter.”
- In the end, note down “Hostname & IP Address.”
- Repeat the steps for all systems that have a multi-user setup.
Step 2: Edit the Windows Hosts File
Now you have to start editing the Windows hosts file:
- First of all, you have to “exit from QuickBooks” and then tap on “Start.”
- Now, reach out to the “PC” for the following :\Windows\Syswow64\Drivers\Etc” or \Windows\System32\Drivers\Etc.
- In case, you can’t discover the “Windows folder” then follow the below-discussed steps to view all hidden files.
- Tap on “View” and then on “Hidden items” to discover all hidden files.
- Then, right-tap on the “Hosts file” and choose “Open with.” then you need to access it via “Notepad.”
- Now provide “IP address & Computer Name“. Remember that when you type the details, instead of the spacebar use the “Tab key” to give space between the system name and the IP address.
Check out the picture below:

- In the end, “Save changes” and “reopen QBs via multi-user mode.”
Method 4: Using QuickBooks Database Server Manager
The server computer stores company files and enables you to share the files with other systems via the same network. We will use the QuickBooks tool Hub in this method and use the Database Server Manager tab. Let’s check the steps:
- Open QuickBooks by tapping on its icon. (Downloading steps mentioned above.)
- Select “Network Issues.”
- Then, choose “QuickBooks Database Server Manager.”
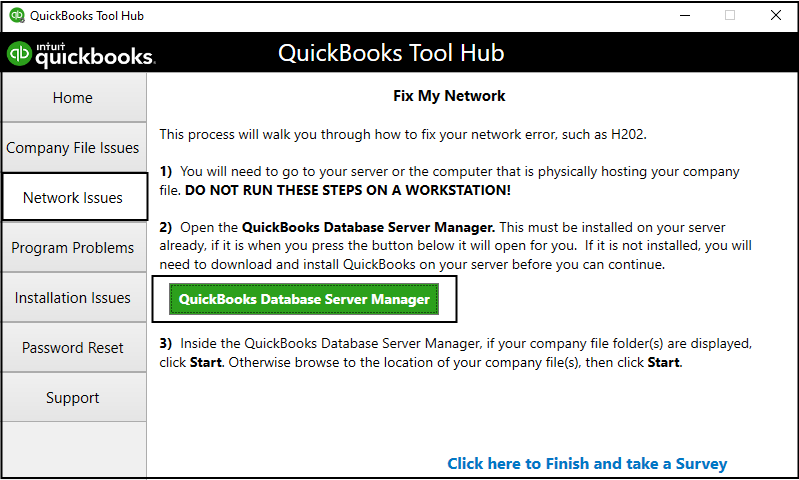
- If you can see the company file, tap on “Start Scan.”
- In case, you are unable to see the folder, tap on browse and then search the name, then hit “Start Scan.”
- Now, the QuickBooks Database Server Manager will initiate a scanning process and automatically repair the error.
- In the end, tap on “Close” once the scan finishes.
Now, attempt to switch QBs into multi-user mode one more time to check if the QuickBooks Error H505 is successfully gone or not.
Method 5: Ping Server Computer from the Workstation
When you use the ping command on your system, you can check the connection between the workstations and the server. Before that, turn on Network Discovery on both the workstations and the server computer. Now, check the steps:
- Tap on “Start” on the workstations and server.
- Write “Network” in the box to access “Network and Sharing Center.”
- Now, select “Change Advanced Settings.”
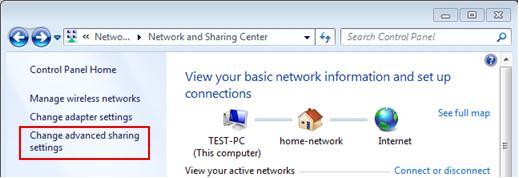
- See that “Turn on Network Discovery” is chosen in the “Printer Sharing” section as well as “Network Discovery and File.”
For the Server Name:
- Tap on “Windows Start.”
- Write “Run” and open it.
- Inside it, write “CMD” and press Enter.
- Then, type “ipconfig/al” on the CMD screen. Hit “Enter.”
- In the section “Windows IP Configuration”, look for the hostname and write it down somewhere.
Return to the Workstation and Test the Server by These Steps:
- Firstly, tap on “Start.”
- Write “Run” in the box to open it.
- Now, in the Run window, type “CMD.” Hit “Enter.”
- After that, drop “Ping_server name” and then press “Enter.”
- Now, you have to follow the same steps on every client computer having QuickBooks error H505 to fix it.
Method 6: Create a New folder for the QB file
- To initiate, you need to open the host computer.
- Also, make a new folder there.
- Thereafter, just give permission to the QB files.
- Try to copy the .qbw file to the newly created folder.
- Move towards the multi-user mode.
- Access the QB file and end the procedure here.
Method 7: Configure the Firewall Ports Settings
- Open the Run window.
- Now, access the Control Panel.
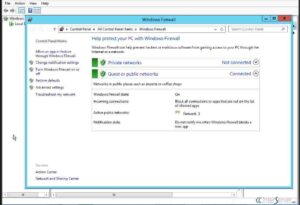
- Subsequently, click on System and Security.
- Afterward, double-click on the Windows Firewall and Network Protection.
- Select the Advanced Settings.
- Tap the Inbound rule.
- Hit the New Rule.
- Then, pick the port and hit Next.
- Consequently, choose the Correct TCP.
- Specify the port of your QB yearly version.
- Click Next after specifying the relevant code.
- Now, hit Next.
- Just restart the QB desktop to put an end to this procedure.
Method 8: Create Exceptions in the System’s Firewall
- Hit the Windows button.
- Go to the Control Panel.
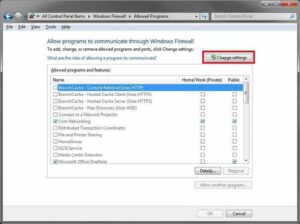
- After that, pick the Firewall settings button.
- Now, click on the option Allow a program via the system’s firewall.
- Choose Add Program button that has QuickBooks 20xx.
- You can find it under the exception list.
- Meanwhile, just reboot your computer to modify all these changes.
- Try to add the ports as per the QuickBooks version you are using right now.
You Might Also Like: QuickBooks Error H202 (Complete Guide)
Method 9: Examine Services on the Server
The user needs to clarify that QuickBooks services are running on the server. For that, follow the steps below:
- To initiate, open the Server system.
- Just access the Windows Start menu.
- Enter Run on the field of the Run window.
- Subsequently, specify services.msc there.
- Also, hit Enter.
- Try to find out the QuickBooksDBXX and launch the same.
- XX here depicts your version of QuickBooks.
- Move towards the Startup type and click on the Automatic button.
- Then, just ensure that the service status is running or not.
- If not then click on Start.
- Click on the Recovery option.
- Try to locate the first failure, second failure, and subsequent failure and choose to Restart the service from there.
- Hit Apply and also choose OK.
- Make sure to consider the same steps for another QuickBooks service QBCFMonitorService.
Method 10: Open Network Ports on QuickBooks
Follow the steps mentioned below:
Step 1: Firewall Configuration
- The first and foremost step for you to do is to click on the Windows Firewall setting.
- Also, perform a right-click on the Windows.
- Choose Control Panel from there.
- Specify the Firewall inside the Search bar.
- Then, hit Enter.
- Choose Windows Firewall now.
- Click on another tab named Advanced Settings.
- Navigate towards the left part of your screen and choose Outbound rules by right-clicking.
- Thereafter, hit the New Rule button.
- After that, click on the Ports.
- Choose Next.
- Select TCP from there and specify the relevant ports.
- Choose the Next button.
- Further, click on Allow the connection.
- Select the Next and Finish buttons.
- You need to now perform the same steps for inbound rules as well.
- Once done, just choose the Multi-user mode and access QuickBooks software.
Step 2: Turn on the Network Discovery
- First of all, access the Control Panel.
- Now, click on the System and Security option.
- Make sure to choose the Windows Firewall button.
- Thereafter, just pick the permit associate app/feature.
- Also, hit the modification button.
- Click on the Network discovery and click OK then.
You Might Also Like: How to Configure QuickBooks Firewall Ports: Complete Guide
Step 3: Locate the Server Name
- Access the Run window.
- Just hit Windows + R buttons.
- Specify CMD inside it.
- Also, click Enter.
- Make sure to put in the following command config/all.
- Then, hit Enter.
- Try to spot the hostname in the section titled IP configuration.
- Now, the server name will be reflected on the right side.
- Hit the Save button and complete the procedure.
Conclusion
So, here are all the solutions for QuickBooks error H505. We believe that the post proves to be efficient enough for resolving all your doubts and queries. You can still ask us anything related to the error and QuickBooks if you want. Also, don’t forget to read and enlighten yourself with other informative articles. You will understand QuickBooks better after reading each post carefully. Therefore, don’t hesitate to hit the notification bar for receiving such posts and articles.
Frequently Asked Questions (FAQs)
Q1.How do I fix error code 6000 83 in QuickBooks?
Here is how you can fix QuickBooks error 6000 83:
- Restore your “Company File”.
- QuickBooks File Doctor Tool.
- Resolve QuickBooks Error 6000 83 Manually.
- Disable Hosting Mode on your Work Stations.
Q2. Why is QuickBooks not syncing between computers?
If you are using QuickBooks in multiuser mode then you might face an issue where QuickBooks is syncing between computers. This error mainly occurs because both your computers are not connected to the same network and you haven’t set the right installation options. To fix this error, you can try connecting to a better internet connection and switch your QuickBooks to multi-user mode.
Q3. Can you transfer a QuickBooks license from one computer to another?
You cannot transfer a QuickBooks license from one computer to another. However, you can use the same QuickBooks account on multiple computers. You can do this by switching your QuickBooks to multi-user mode. This way, various people would be able to use your QuickBooks account from different locations around the world.