
Are you facing trouble while using QuickBooks as it comes up with errors? But don’t worry as sometimes you get errors while installing QuickBooks then there is a tool that resolves your issue which is the QuickBooks Component Repair Tool. We will guide you step-by-step for using the QBs Component Repair tool and fixing the prevailing issues. Whether you are a business owner or an accountant, we’ll get you up and running quickly.
What is QuickBooks Component Repair Tool?
The QuickBooks Component Repair Tool is provided by Intuit, the company behind QuickBooks accounting software. It is designed to diagnose and resolve common issues and errors related to QuickBooks components and their dependencies.
The tool helps in repairing various components that are crucial for the proper functioning of QuickBooks, such as the Microsoft .NET Framework, Microsoft MSXML, and Microsoft Visual C++. These components are essential for QuickBooks to run smoothly on your computer.
The Component repair tool in QuickBooks works by scanning your system for any damaged or corrupted components related to QuickBooks and then automatically repairs or reinstalls them. This can help resolve errors that may occur due to missing or damaged components, such as installation errors, runtime errors, or issues with opening QuickBooks company files.
Also Read: Quickbooks Connection Diagnostic Tool
Download & Install Quickbooks Component Repair Tool
Here are some steps you need to follow to download the component repair tool QuickBooks:
- Ensure that all background-running programs are shut down.
- Then visit the official website to download QuickBooks Component Repair Tool.
- Now, you will see a .exe file then tick on I Agree to the terms and conditions.
- Last but not least, restart your computer.
After successfully completing the QuickBooks Repair Tool Installation Process, let’s see how to use this software to resolve different issues and errors.
How to Run QuickBooks Component Repair Tool
To use the component repair tool for QuickBooks, you will need to perform QuickBooks component repair tool download and installation. For using this tool, follow the instructions given below:
- Firstly, you need to reboot your PC before using the tool.
- Then turn off all running programs.
- Now, the tool will detect all the errors and provide you with ways to fix them.
- At last, reboot your system.
Fix Common QuickBooks Desktop Installation Errors
Go through the steps to fix the install error of QBs desktop:
1. Update your Windows to the Latest Version
Try to use the updated version of the component repair tool in QuickBooks so that you can resolve QBs installation errors. For that, simply follow these easy steps:
- Tap on Start and then choose Settings.
- Then click on Update and Security.
- After that select Windows Update and press Check for updates.
2. Run QuickBooks Install Diagnostic Tool
This tool fixes issues related to installation errors. So for fixing it, you should use QB install diagnostic tool by following the steps given below:
- First, open your QBs tool hub and select Installation Issues.
- Now, tap on QuickBooks Install Diagnostic Tool.
- Let the tool run and it will take a few seconds.
- Lastly, reboot your PC.
Way to Fix Installation Errors using QuickBooks Component Repair Tool
If the QuickBooks component repair tool for Windows 10 fails to fix the issue then try to fix it manually. For that, we will be looking for different ways:
Step 1: Repair .NET Framework Errors
This tool will help to solve the issue related to .Net Framework. Do it manually by going through the instructions:
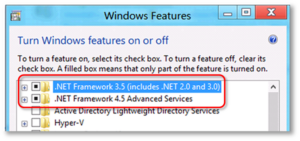
- Turn off all running software applications.
- Then tap on the Windows Start option and choose the Control Panel.
- Select Add or Remove Programs and choose Microsoft .Net Framework.
- Now, click on the Repair menu and wait till it repairs the file.
- At last, restart your system.
Step 2: Reconstructing “Microsoft MSXML”
Your QuickBooks software may not function well due to damage in the Microsoft MSXML. So, with the help of QuickBooks Component Repair Tool, you can repair it with these steps:
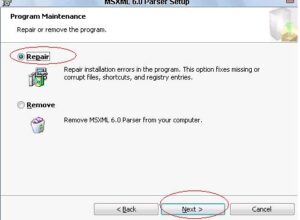
- Firstly, you need to register MSXML DLL files.
- Then Uninstall & reinstall MSXML 6.0.
- After that Install it again and repair MSXML 6.0 with the help of QBs Component Repair Tool.
Also Read: How to Create a Portable Company File in Quickbooks – Full Guide
Conclusion
In a nutshell, the QuickBooks Component Repair Tool is a helpful utility provided by Intuit to diagnose and resolve common issues related to QuickBooks components. It scans your system for damaged or corrupted components such as Microsoft .NET Framework, MSXML, and Visual C++, which are crucial for the proper functioning of QuickBooks.
We have made an effort to cover all the aspects of the QuickBooks Component Repair tool in this blog. We recommend giving us a call if any questions are persistent or if you need assistance from an expert. Our technical staff is here to help you with immediate fixes round-the-clock.
Frequently Asked Questions (FAQs)
Q1. What happens when you rebuild data in QuickBooks?
When you use Rebuild data in QuickBooks then it will automatically fix minor issues related to your company file.
Q2. How do I fix error 1935 in QuickBooks?
- Turn off Your Antivirus Temporarily.
- Use Selective Startup.
- Run Install Diagnostic Tool.
- Check .Net Framework.
Q3. Can you repair .NET Framework?
Yes, you can repair it with the help of the .NET Framework Repair Tool.