While working on the powerful software Quickbooks, users often encounter “Quickbooks Error 15215 Server Not Responding” messages on their screens. Well, this is a common error that occurs while updating the payroll and maintenance release. It is also caused due to the access limitation to the server, another application running in the background, firewall software blocking QuickBooks payroll from connecting to the server, etc. This error means that your system fails to verify the digital signatures which can impact your daily tasks.
This nagging error is frustrating as it stands between you and your important work. So, it is equally necessary to eliminate this troublesome issue that is affecting your work productivity. This informative post will identify the root source of “Quickbooks Error #15215”, symptoms, and proven troubleshooting methods to fix it permanently.
Symptoms of Quickbooks Error 15215
In this section, we have discussed the potential signs that show that your software is suffering from “Error 15215.”
- When this error occurs, it immediately crashes the active programs as well as applications.
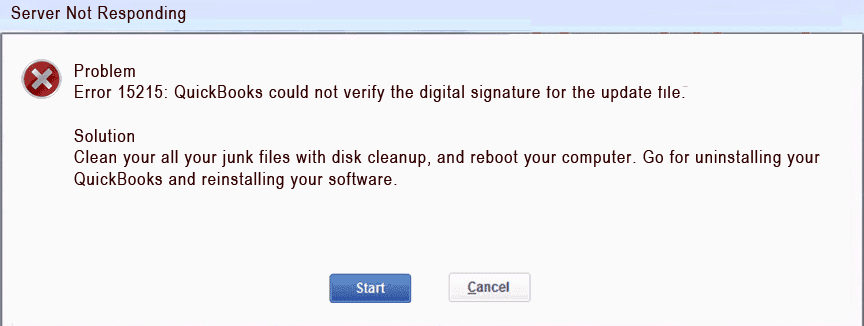
- The image below is similar to what comes on the desktop:
- Your system gets damaged while running a similar program simultaneously.
- Your screen flashes “Quickbooks Error 15215: can’t verify this digital signature.”
- Slow performance of the windows.
- The system responds slowly or just stops taking commands from the mouse and keyboard.
- Your computer starts freezing.
Causes of Quickbooks Maintenance Release Error 15215
Error 15215 Quickbooks, can’t appear out of the blue. Various factors are behind the occurrence of this error. We have mentioned all the major causes below so that you could prevent this troublesome error to take place in the future:
- Improper QuickBooks installation.
- Corrupt QuickBooks payroll files.
- Windows system gets damaged due to virus, malware, or other infection.
- Some important QuickBooks files get deleted due to malicious activity or accidentally.
- Improper configuration of Microsoft Internet Explorer.
- One of the major reasons for “Quickbooks Error 15215” is maybe an application is running in your system’s background and on the other hand, an update is interrupting the method.
Now, let’s learn how to repair this error with little technical aid. Keep reading.
Proven Steps to Repair “Quickbooks Error 15215 Server Not Responding”
We recommend you follow all instructions carefully and step by step to avoid any data loss. Make sure to create a backup before applying any of the below-mentioned methods.
Solution 1: Reboot the System
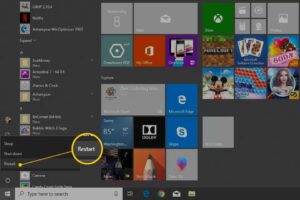
This is the first and straight solution to fix the error. It is believed that when you reboot your system all files also get afresh from scratch.
Sometimes, this step can repair most of your issues such as network issues, internet problems, and printing errors. However, if even after restarting the computer, this problem is not fixed and you are still receiving the error then stop all the running applications first and jump to the next method.
Solution 2: Running QuickBooks as the Window Administrator
Coming to this effective method, running your QBs Desktop as a windows admin allows the software to receive priority over other applications in Windows OS. Additionally, this informs Windows to permit QuickBooks to use any kind of resources needed to function.
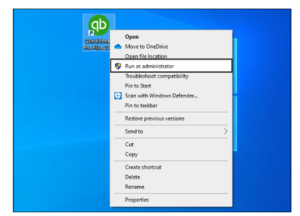
- First of all, exit from the QuickBooks Desktop program.
- Now right-tap on the QBs Desktop icon.
- After that choose “Run as administrator.”
- If prompted with a notification then choose “Yes.”
Solution 3: Restart Windows using Selective Start-up
- Firstly, close QuickBooks Desktop.
- Now open the “Run” window:
- For Windows XP users: Choose “Start” => “Run” icon.
- Users having Windows 7 and Vista: Go to “Start” > “All Programs” > “Accessories” = “Run”.
- For Windows 8 and 10 users: Hold “Windows+R”.
- Then, in the “Run” section, write “Msconfig” and hit “OK.”
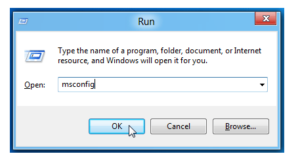
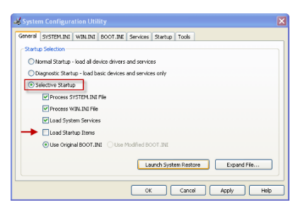
- After that, the window of “System Configuration Utility” will immediately open.
- Select “Selective Startup” and clear the checkbox of “Load Startup objects.”
- Tap on “OK” to save these changes.
- Now, you have to restart the computer.
- After that, reopen QuickBooks & update the current tax table.
- Now repeat steps 1 to 4 to return to “System Configuration Utility.“
- Select the checkbox of “Normal startup” and tap on “OK”.
- In the end, restart the computer again to finish the step.
Also Read, Recover Deleted/Lost Data using Quickbooks Auto Data Recovery
Solution 3: Verify Use TLS 1.0 is marked, and Use TLS 1.1 & Use TLS 1.2 are Unmarked
In this method, you need to make sure that in the window “Internet Options” “Use TLS 1.0” should be marked, and Use TLS 1.1 & Use TLS 1.2 should be not marked. The steps are:
- Exit the “QuickBooks” application.
- Now open your “Internet Explorer.”
- After that visit “Tools” > “Internet Option”.
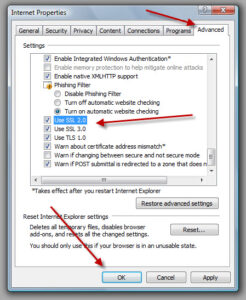
- Tap on “Advanced.”
- Inside the “Advanced Settings” option, find ‘Use TLS 1.0, Use TLS 1.1 & Use TLS 1.2’.
- Further, verify that the Use TLS 1.0 is already marked.
- Now, make sure that the Use TLS 1.1 & Use TLS 1.2 aren’t marked.
- Tap on “OK” to exit from the windows.
- Close the “Internet Explorer.”
- After that, reboot your system and then reopen QuickBooks.
- In the end, attempt to download the QBs update again.
Solution 4: Installing Updates Manually
- The first step is to reach out to update QuickBooks software to its latest release.
- After that, select the product.
- Now tap on the “Change option” then select the “QuickBooks product“.
- Followed by choosing the “Update option” and then the location to save the file.
- Then, press the tab on the “Save option“.
- Locate the download file.
- Now, tap twice on the option “Install the update.”
- After the installation part, you need to “Restart the Windows“.
- After completing all the above steps, tap on “Open QuickBooks” and check you have the latest update installed, and in the end, press the “F2” key.
Solution 5: Clean Boot Windows
Sometimes, cleaning boot windows can help in fixing Quickbooks Error #15215 as few items in your system can give birth to issues. If you are suspicious that some programs in your computer are causing “QuickBooks Update Error 15215 Server Not Responding” then you can clear it by reaching out to Microsoft’s official website. After cleaning the programs/items you will not receive the error codes on your screen.
Also Read, QuickBooks Update Error 404: Fixing in Six Quick Steps
Final Words
We truly hope that this informative post is sufficient enough to repair the “Quickbooks Error 15215 Server Not Responding.” The steps mentioned are easy to understand and apply. Any newbie or user having less technical knowledge can also utilize this post. However, if you have more doubts while following any step then we would recommend you to communicate with Quickbooks Customer Support. The team is 24×7 available to help all users with their best guidance.
With this, we finally conclude our article, but you can always stay connected with us by visiting our website and reading more interesting articles.
Frequently Asked Questions (FAQs)
Q1. How do I fix a QuickBooks license error?
Few methods that help you to fix QuickBooks license errors:
- Upgrade your QuickBooks.
- Use QuickBooks File Doctor Tool.
- Disable your Antivirus Protection temporarily.
- Remove QuickBooks Entitlement Data File.
Q2. How do I fix error code 15270 in QuickBooks?
Just follow these instructions to resolve QuickBooks error code 15270:
- Update your QuickBooks from the Main Option.
- Switch Off User Account Control.
- Utilize QuickBooks Tool Hub.
- Correct Employer Identification Number
Q3. How do I resolve QuickBooks Payroll error PS036?
To resolve QuickBooks Payroll Error PS036 follow these procedures:
- Use Clean Install Selective Startup Mode.
- Change the name of the Paysub.ini file.
- Check QuickBooks Payroll Subscription